
refrigerator
-
Inspect the inside and remove the cause of performance deterioration and dust. Restores the cooling capacity of the refrigerator!
Visit to your home Estimated working time: Approximately 60 minutes Up to 400 liters 5,280 yen (1 unit / tax included) 401 liters or more 7,370 yen (1 unit / tax included) 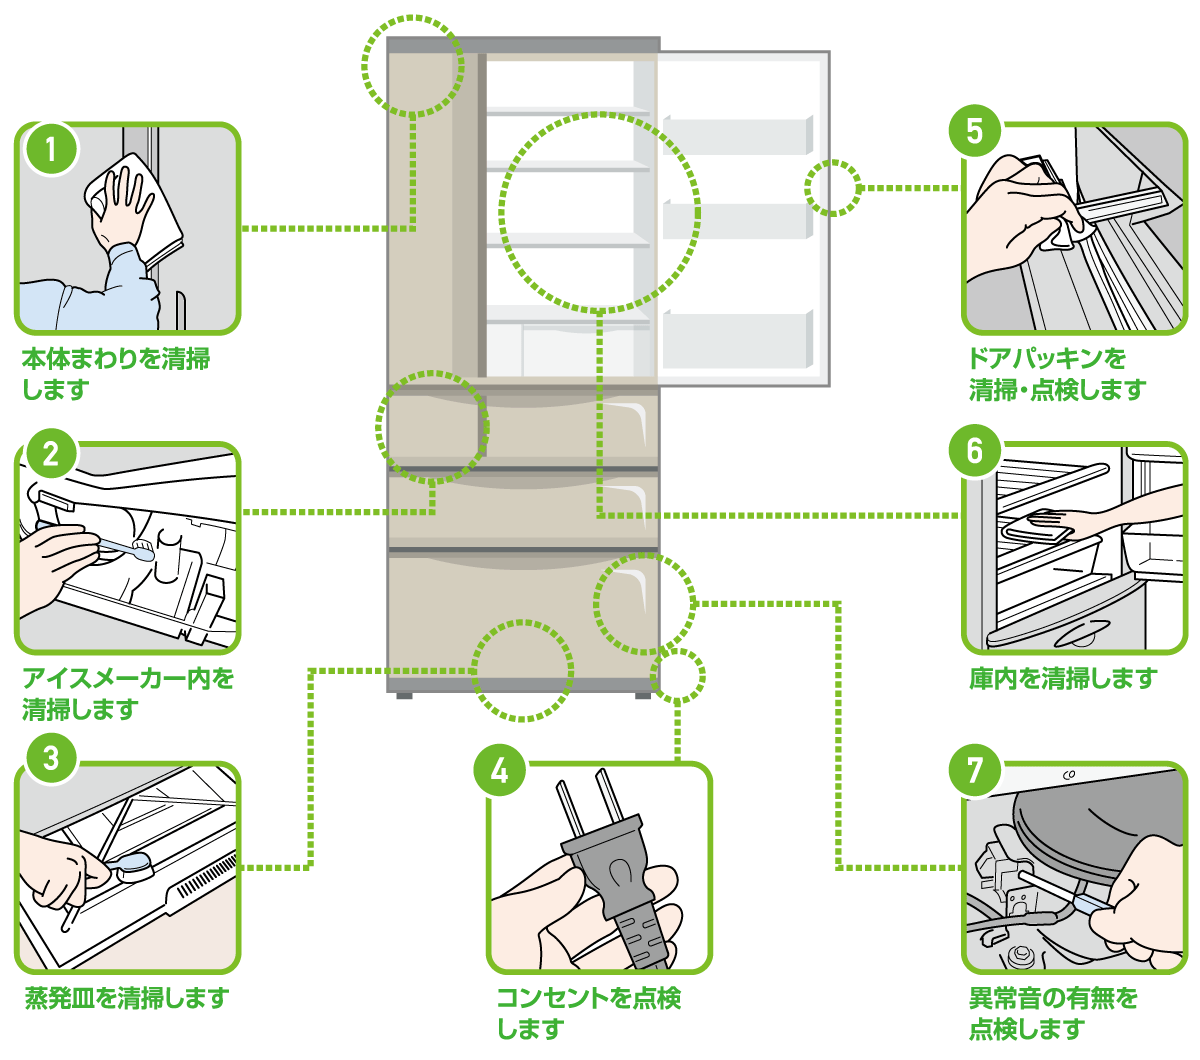
① Cleaning around the main body
Wipe the area around the main unit and the ceiling with a neutral detergent. On the back side, vacuum the fan and heat dissipation pipe with a vacuum cleaner.
② Cleaning inside the ice maker
Clean the tank and tank cap inside the ice maker with a special brush.
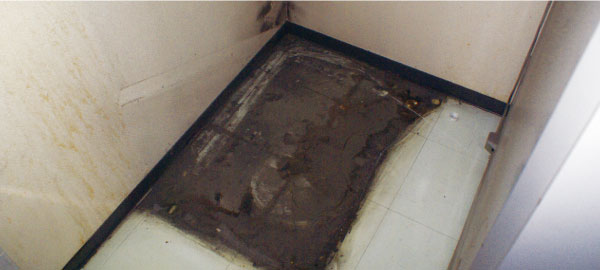
③ Cleaning the evaporating dish
Check that there is no abnormal accumulation of water in the evaporating dish, and carefully clean the water stains and dust with a brush.
④ Inspection of outlet
Check for abnormal heating, bending, half-breaking, and patina.
⑤ Cleaning and inspection of door packing
Check the door packing for slack and cracks, and wipe off the dirt with a neutral detergent.
⑥ Cleaning the inside of the refrigerator
Clean the shelves, door pockets and walls inside the cabinet with a neutral detergent. Finally, disinfect everywhere with alcohol.
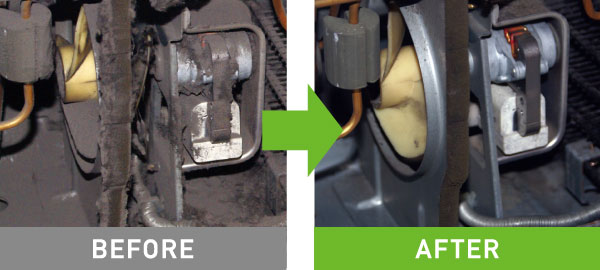
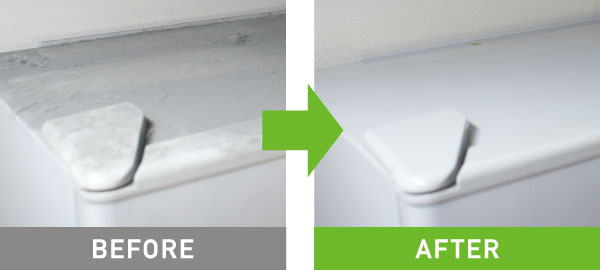
⑦ Check for abnormal noise
Check the compressor body, its surroundings, and the blower fan for abnormal noise, and clean the machine room.
The difference is clear before and after cleaning! So beautiful with professional technology!
|
Remove all the dust that has accumulated on the back side!
|
Even more dirt on the ceiling, which is hard to reach!
|
|---|---|
|
Clean the bottom of the refrigerator, which is difficult to move!
|
Washing machine
-
Check the condition of the motor and fan and remove the accumulated dust. Prevents fan failure!
Visit to your home Estimated working time: Approximately 40 minutes vertical 4,730 yen (1 unit / tax included) Drum type 6,820 yen (1 unit / tax included) 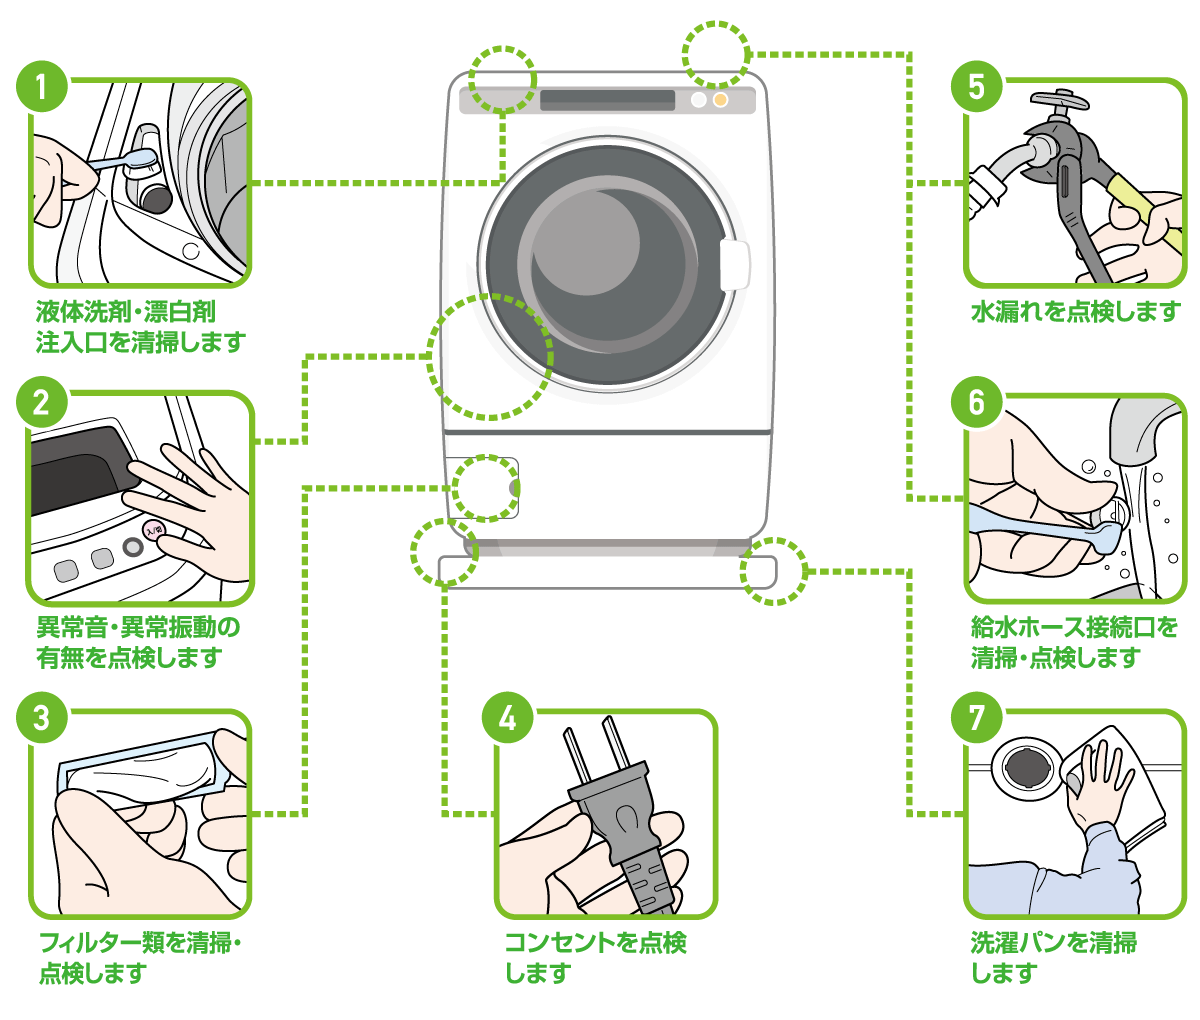
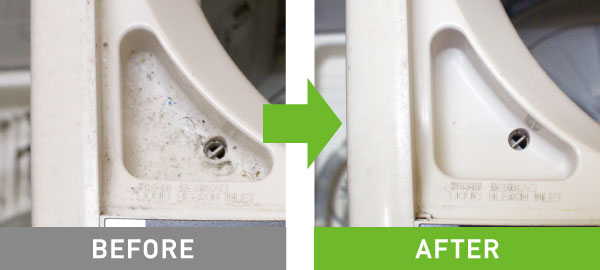
① Cleaning of liquid detergent / bleach inlet
Removes all sticky detergent, bleach, and hardened dust.
② Check for abnormal noise and vibration
After a trial run, check for abnormal noise and vibration during washing and dehydration operation.
③ Cleaning and inspection of filters
Check if the intake filter and lint filter are damaged. Manually remove the attached dust and dirt.
④ Inspection of outlet
Carefully inspect for abnormal overheating during operation, broken / half-broken cords, patina adhesion, ground wire connection, etc.
⑤ Check for water leaks
Check after a trial run to see if water leaks occur during water supply / drainage.
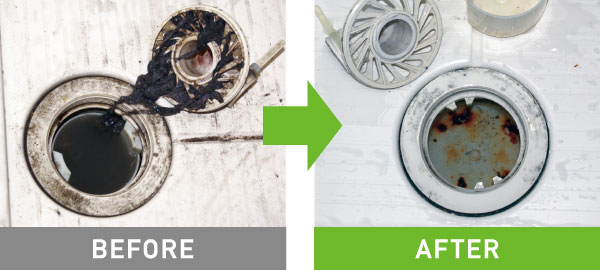
⑥ Cleaning and inspection of water supply hose connection port
Check for water leaks and carefully remove the dust that has accumulated on the filter with a special brush.
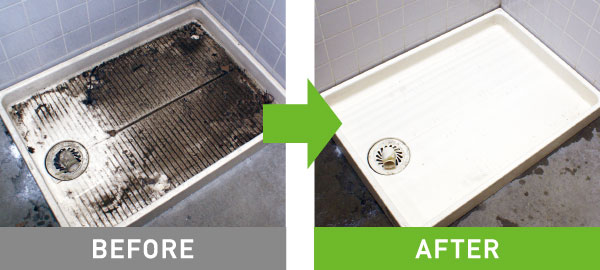
⑦ Cleaning the washing pan
After moving the washing machine, clean it with a mild detergent. Disassemble the drain and clean the inside cleanly.
The difference is clear before and after cleaning! So beautiful with professional technology!
|
The laundry bread is so white that it can be mistaken!
|
Clean up dust and dark spots on the water supply hose and connection port!
|
|---|---|
|
Clean even the finest parts of the liquid detergent / bleach inlet!
|
The drain is disassembled to clean the inside!
|

TV set
-
Check if the program looks beautiful and does not generate heat. Prevent TV breakdowns!
Visit to your home Estimated working time: Approximately 50 minutes Up to 42 type 3,740 yen (1 unit / tax included) 43 type or more 5,830 yen (1 unit / tax included) 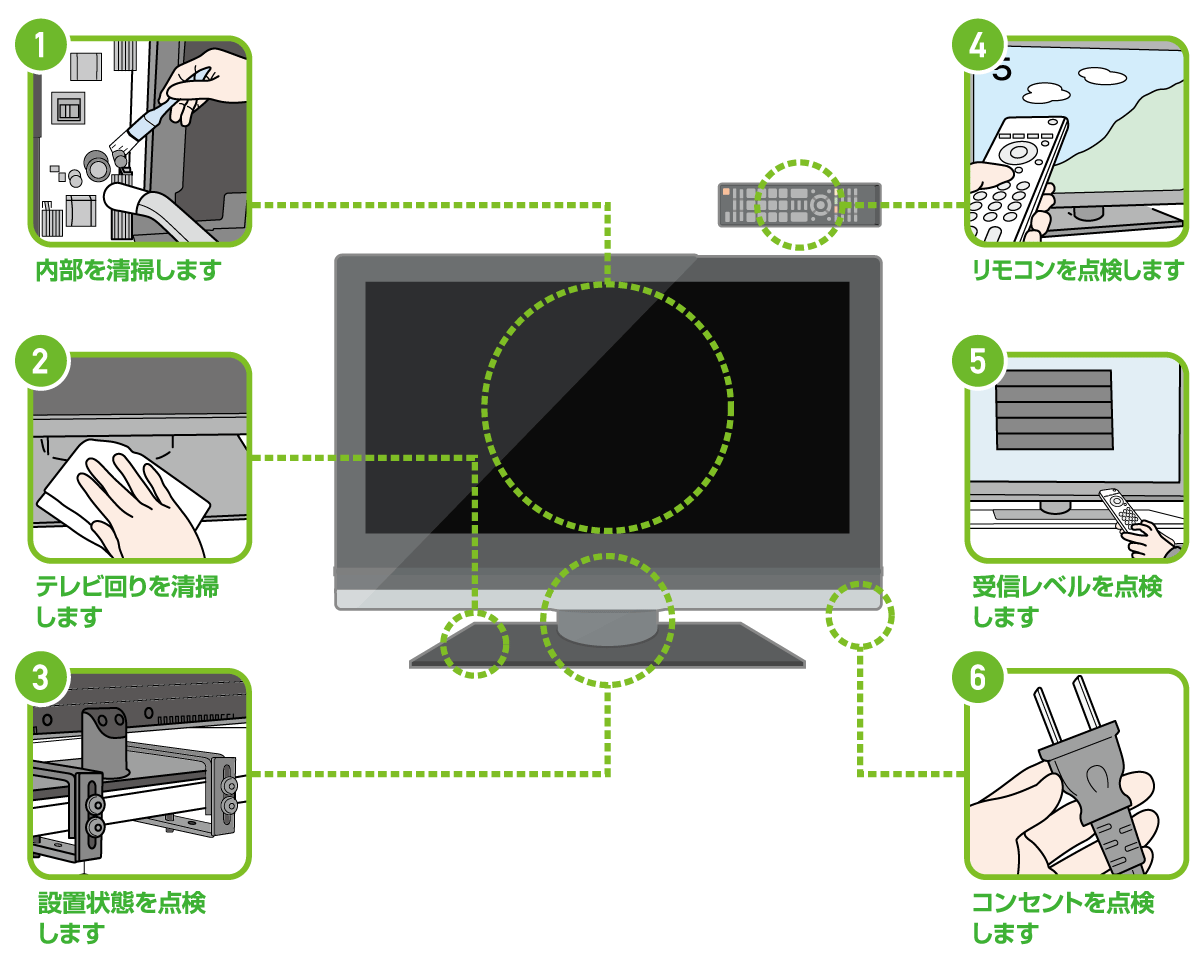
① Cleaning the inside
Remove the back cover and use a brush and cleaner to remove any dust inside that may cause a malfunction.
② Cleaning around the TV
Wipe off the dust collected on the TV stand and back cover with a rag. Clean the liquid crystal surface with a special cleaning kit.
③ Inspection of installation condition
Check that fall prevention measures have been taken.
④ Inspection of remote control
Make sure it works properly when you press the button and that the batteries are properly loaded.
⑤ Check reception level
Operate the remote control and check if the broadcast is being received normally.
⑥ Inspection of outlet
Carefully inspect for abnormal overheating during operation, broken / half-broken cords, and patina adhesion.
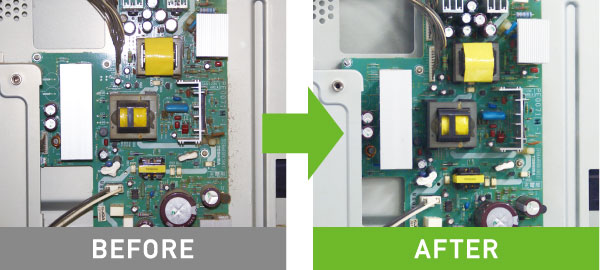
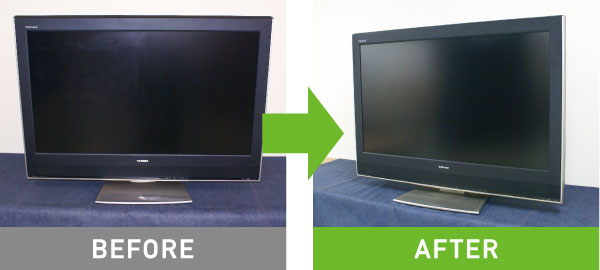
The difference is clear before and after cleaning! So beautiful with professional technology!
|
Clean the internal dust that may cause a malfunction!
|
Removes all internal dust that collects on the back cover!
|
|---|---|
|
Wipe off any dirt on the LCD screen!
|
There is dust inside the TV without knowing it ...
|
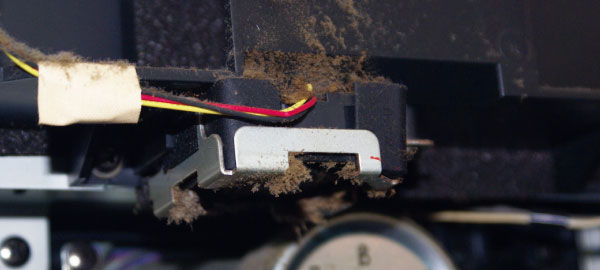
Air conditioner
-
Checks the temperature difference during suction and blowing, and eliminates clogging of the filter. Improve the effectiveness of the air conditioner!
Visit to your home Estimated working time: Approximately 30 minutes Indoor unit / outdoor unit set 3,740 yen (1 set / tax included) 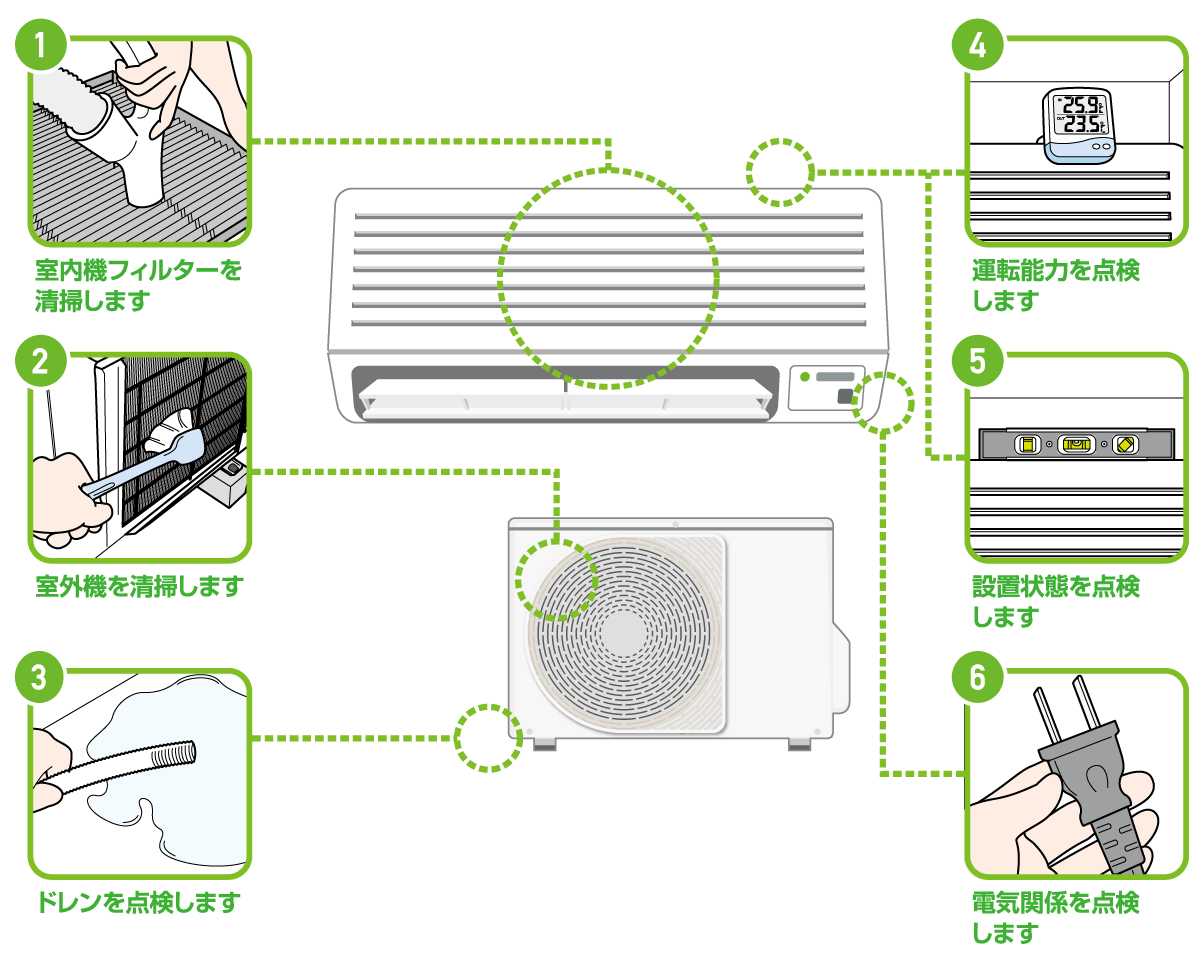
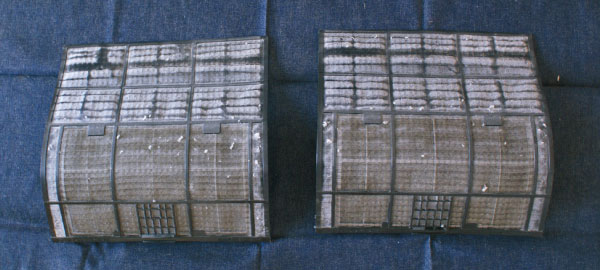
① Cleaning the indoor unit filter
Clean the clogging that leads to a decrease in driving ability with a cleaner or water wash.
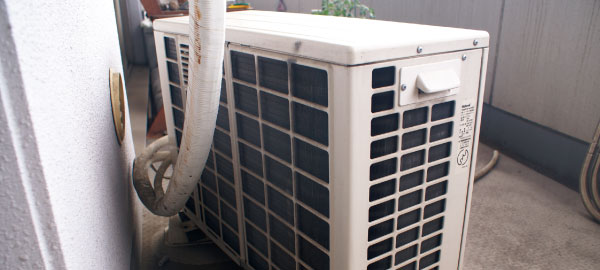
② Cleaning the outdoor unit
Removes dirt and foreign matter adhering to the aluminum fins.
③ Drain inspection
Actually pour water into the drain pan and check the drainage condition. Also check that the drain pipe is not clogged with foreign matter.
④ Inspection of driving ability
Check the temperature difference during suction and blowing with a thermometer. Also, use a clamp meter to measure the operating current and check for any abnormalities.
⑤ Inspection of installation condition
Check that the indoor unit is installed horizontally and that there is no rattling.
⑥ Electrical inspection
Check the outlet and outlet plug for discoloration and plugging defects. Also check for defective crossovers.
The difference is clear before and after cleaning! So beautiful with professional technology!
|
The filter is clogged with dust!
|
Check for clogging of the heat exchanger of the outdoor unit!
|
|---|---|
|
Don't forget to check the outlet plug!
|
Check if the drain pipe is clogged with foreign matter!
|
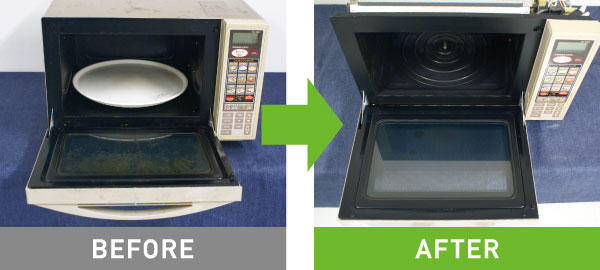
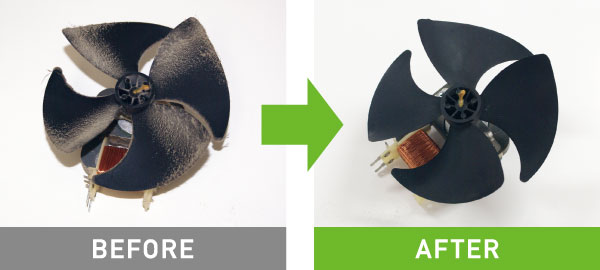
microwave
-
Cleaning and inspection from the internal board / blower fan to the mica plate. Prevent microwave oven failure!
Visit to your home Estimated working time: Approximately 40 minutes microwave 3,740 yen (1 unit / tax included) 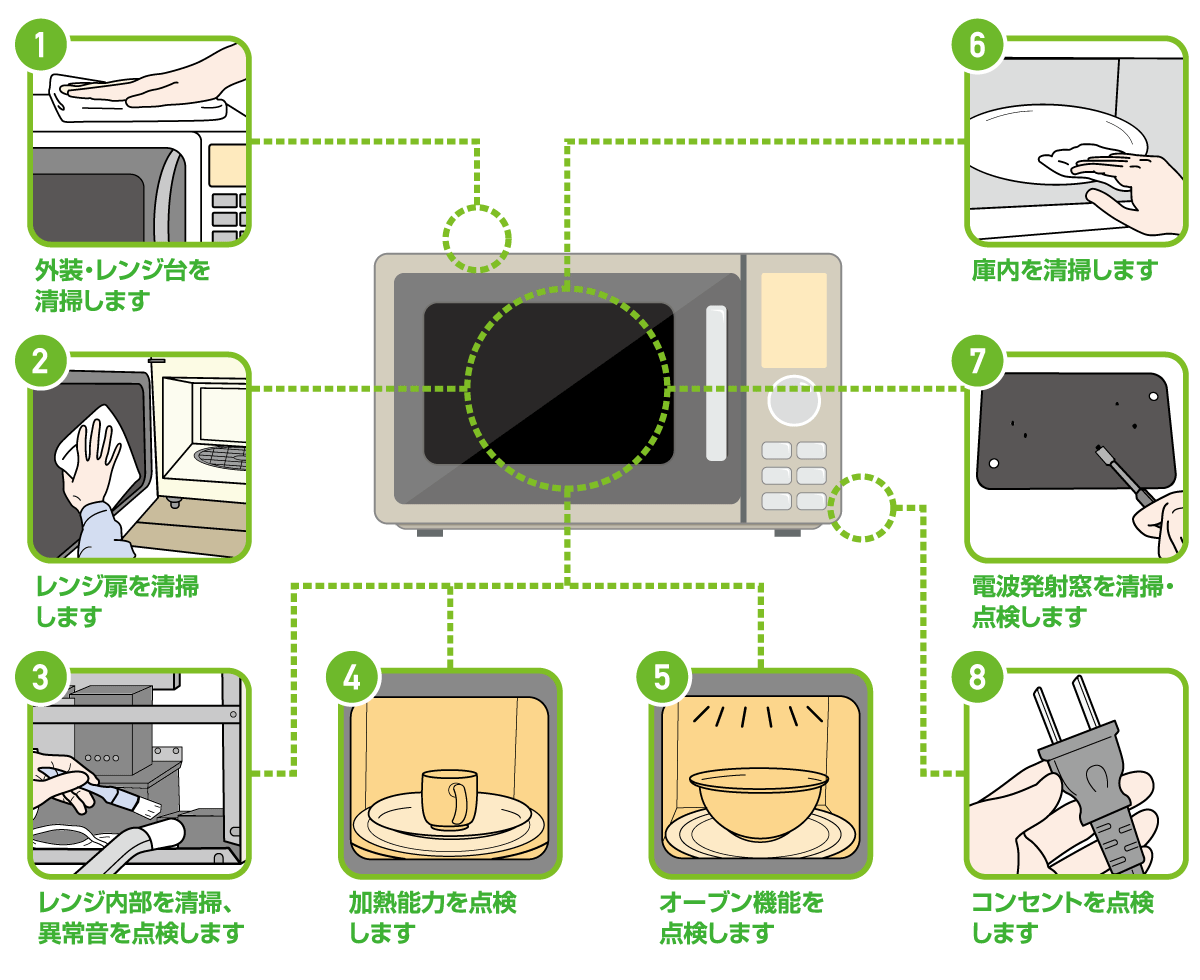
① Cleaning the exterior and microwave oven
To remove dust and oil stains, apply a neutral detergent to the towel and wipe it clean. Thoroughly clean persistent stains with cleaning wax.
② Cleaning the range door
Use a neutral detergent to wipe off oil stains on the glass surface and around the hinges.
③ Cleaning the inside of the microwave oven and checking for abnormal noise
Remove the exterior and thoroughly clean the magnetron, board, and blower fan with a cleaner. Check if there is any abnormal noise from each part.
④ Checking the heating capacity
Borrow a coffee cup, teacup, etc., add water and heat at 500W for 1 minute. Check the heating capacity from the change in water temperature.
⑤ Inspection of oven function
When operating the oven, check that it is heating normally and that the heater is lit.
⑥ Cleaning the inside of the refrigerator
Removes all food debris scattered on the rotating plate and bottom.
⑦ Cleaning and inspection of radio wave emission window
Causes of mica plate deterioration ・ Carbonized food residue is scraped off using a river. Also, check for any abnormalities such as sparks during operation.
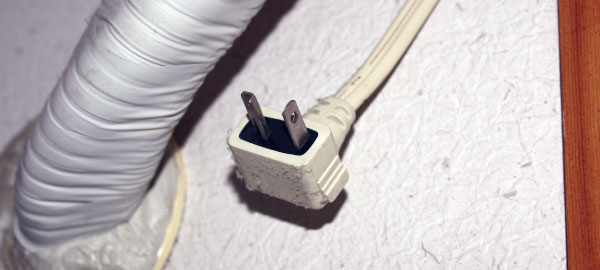
⑧ Inspection of outlet
Carefully inspect for abnormal overheating during operation, broken / half-broken cords, and patina adhesion.
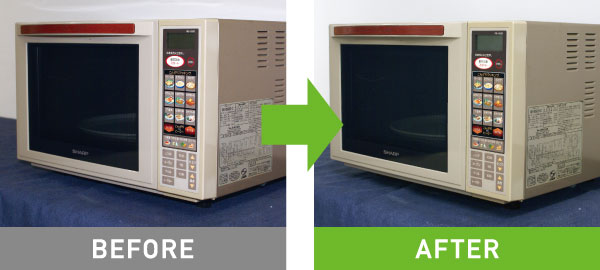
The difference is clear before and after cleaning! So beautiful with professional technology!
|
Remove the oil on the exterior and make it look like new!
|
Remove oil stains and make the door glass shiny!
|
|---|---|
|
The carbonized food residue disappeared without a trace!
|
Dust-covered fans are so beautiful!
|

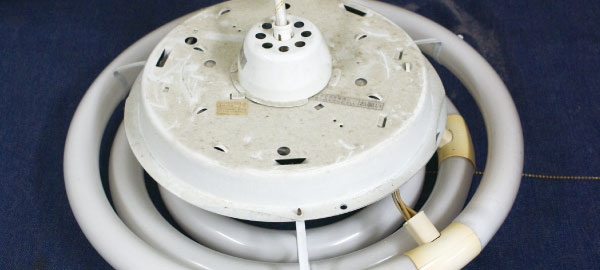
ceiling light
-
Cleaning and inspection from the internal base to light bulbs and insect repellent spacers. Prevents ceiling light failure!
Visit to your home Estimated working time: Approximately 20 minutes Ceiling light (lighting) 2,640 yen (1 unit / tax included) 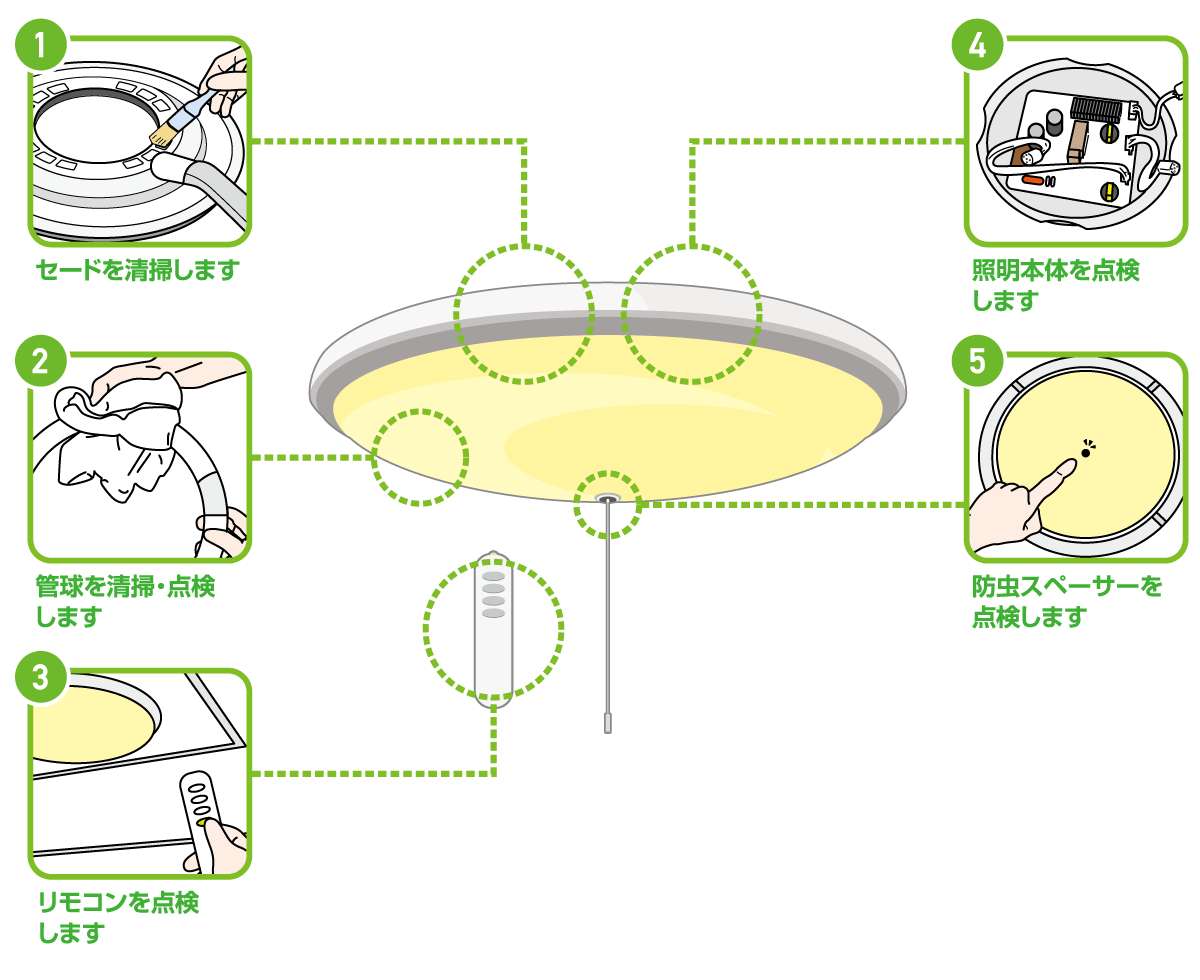
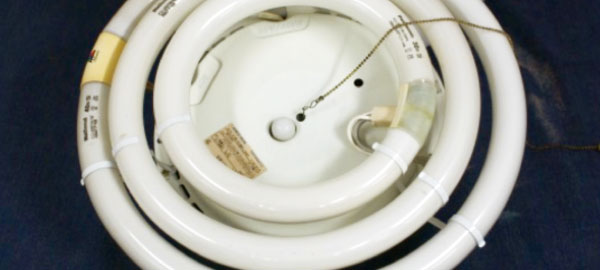
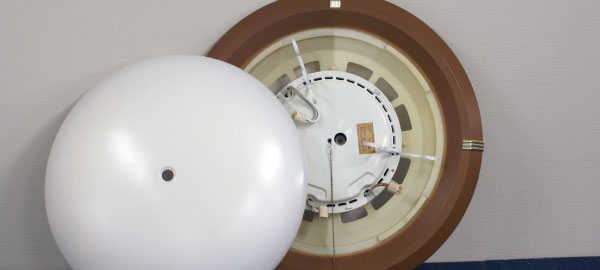
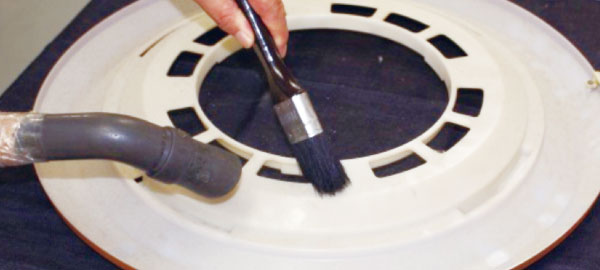
① Cleaning the shade
After removing the shade and disassembling it, clean it with a brush and cleaner to remove dust and oil stains.
② Cleaning and inspection of the tube
After visually checking the brightness, remove the tube and wipe off the dirt with a towel.
③ Inspection of remote control
Check that it works properly when you press the button, and that the batteries are loaded correctly.
④ Inspection of the lighting body
Check that there are no abnormalities in the terminal connections, wiring, sockets, boards, etc.
⑤ Inspection of insect repellent spacer
Check that there are no gaps between the switch cord and the hole for insects to enter, and that the cushion between the light and the shade has not deteriorated due to heat.
The difference is clear before and after cleaning! So beautiful with professional technology!
|
The upper part of the lighting is full of dust and oil stains!
|
Clean the fluorescent tube!
|
|---|---|
|
Disassemble the shade and clean it everywhere!
|
Remove dust with a brush and cleaner!
|
Vacuum cleaner
-
Inspect the hose and motor to clear the filter clogging. Restores the suction capacity of the vacuum cleaner!
Visit to your home Estimated working time: Approximately 20 minutes Vacuum cleaner 2,640 yen (1 unit / tax included) 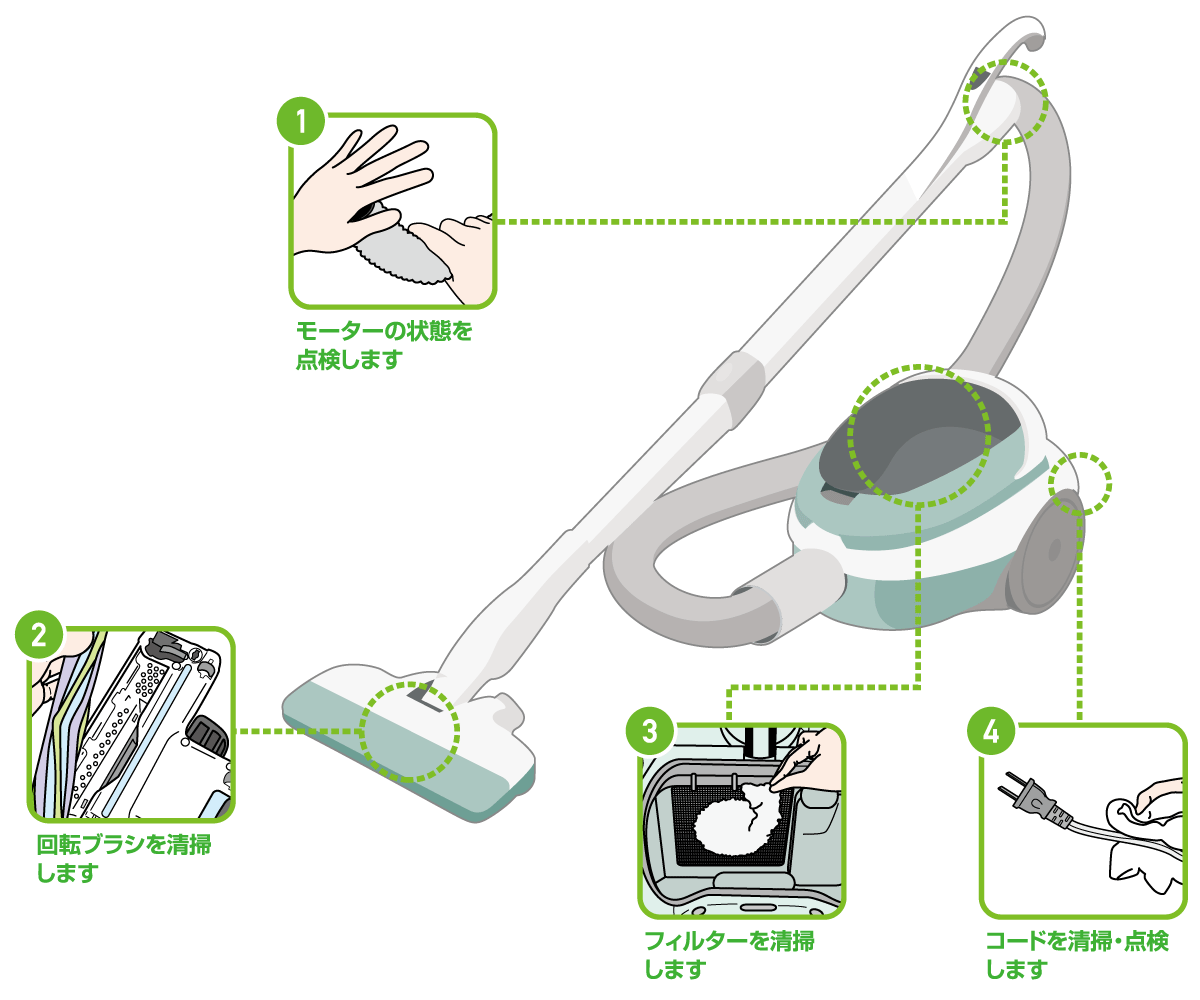
① Inspection of motor and hose
Check the suction capacity by closing the tip of the hose with your hand. Also check the operating noise of the motor to see if there are any abnormalities or if there is any foreign matter inside the hose.
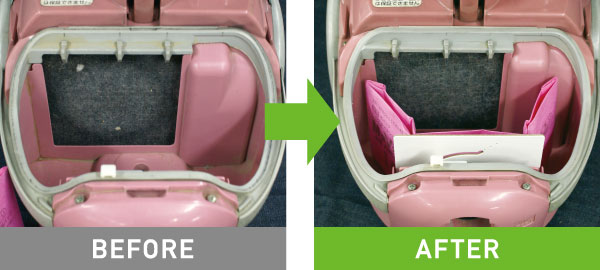
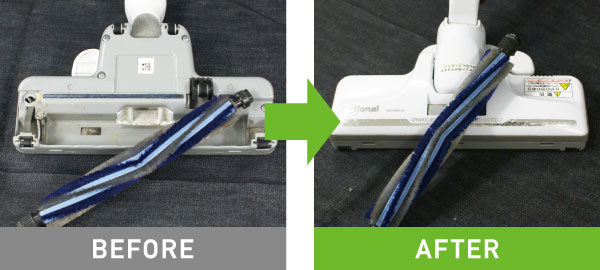
② Cleaning the rotating brush
Remove the rotating brush from the nozzle and carefully remove the hair and dust that cause the decrease in rotational force by hand.
③ Cleaning the filter
Carefully remove the dust stuck in the filter eyes by hand. Restores the reduced suction power. If you have more than one filter, clean them all.
④ Cleaning and inspection of the cord
After checking that the tip of the AC plug is normal, wipe off the dirt on the cord with a towel.
The difference is clear before and after cleaning! So beautiful with professional technology!
|
Removes all dust stuck in your eyes!
|
Clean up hair and dust stuck in the rotating brush!
|
|---|
AV equipment wiring summary
-
After organizing the complicated wiring, it is unified with a spiral tube. The wiring around each AV device is refreshing!
Visit to your home Estimated working time: Approximately 20 minutes AV equipment wiring summary 2,200 yen (1 unit / tax included) 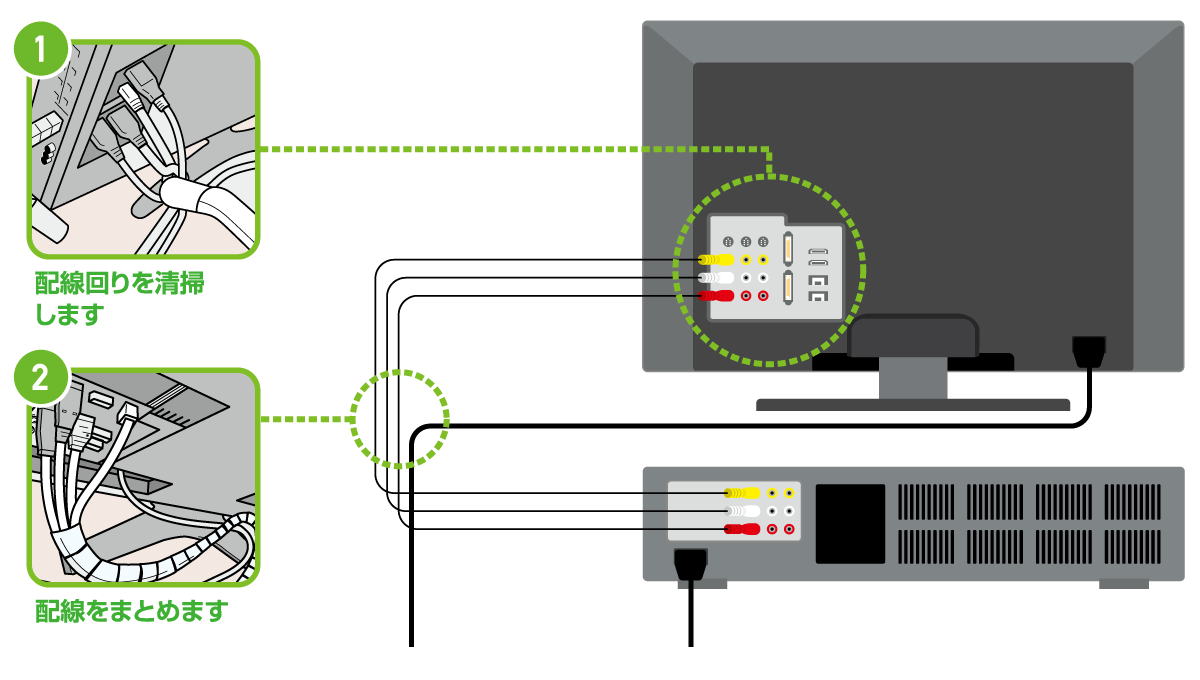
① Cleaning around the wiring
Clean the dust from the wiring with a cleaner.
② Summary of wiring
The wiring of each AV device is put together with a spiral tube to make it neat. If the wiring is complicated, reinsert it, organize it, and then put it together.
[2 or more types of services] or [2 or more units of the same service] Apply for the same service at the same time and get 1,000 yen off for the second and subsequent units!
|
Apply at the store |
Please be sure to check ・ The amount shown is for one unit. Please ask the clerk for the charges for the second and subsequent units.・ Please note that there is no equipment warranty after each service menu is completed. ・ Please note that the power will be temporarily turned off during cleaning and inspection of the refrigerator. ・ Excludes high-altitude installations (3 m or more) such as ceiling light atriums and chandeliers. ・ AV equipment wiring summary is the charge for up to 1 TV and 2 AV equipment. (Additional equipment will be quoted separately) ・ If you would like the AV equipment wiring summary service when the TV you purchased is delivered, we will accept it for 1,100 yen (tax included). ・ Please note that there is no equipment warranty after each service menu is completed. ・ The menu will be provided only within the area designated by us. ・ Commercial equipment is not applicable. ・ If you find a failure, we will repair it. (Repair fee is required separately) |